This chapter contains the following topics:
Introduction to Check and Remittance Forms
Entering Check and Remittance Forms
Displaying a Check and Remittance Form
Printing a Check and Remittance Forms List
This selection allows you to tailor checks to work with your check forms. It also provides a means of designing a remittance form that will print check information when you are using ACH processing.
A check or remittance format is selected for printing during Print checks and post.
Before you start entering a remittance form, read the appendix Implement Positive Pay and Direct Deposit for the steps you need to do to setup direct deposit ACH and remittances.
Check Forms
If any of the predefined check formats, 1 through 4, (Fmt1, Fmt2, Fmt2 with Ref and Fmt1 on blank stub) as entered in the A/P Control information, are sufficient for your needs, you need not design a check format. However if you prefer to design a custom check format the A/P Control information Check format to use field must be selected as 5. Then the information in this chapter can be used to help you design a custom check format.
When designing a custom check, produced by your forms supplier, first enter the check form specifications in PBS and verify that it prints on all the printers that are going to print A/P checks. Provide the specifications and check example to your forms supplier.
You may merge the format with a graphical file that contains a logo or other elements of the form. This option is only available if you are running PBS via Windows or Thin client.
|
Note |
You cannot print the bank routing number, your account number and check number on the check. This is due to the MICR (magnetic ink character recognition) encoding needed on the check for these fields. MICR is a technology used to verify the legitimacy or originality of paper documents, especially checks. Special ink that is sensitive to magnetic fields is used in the printing of certain characters on the original documents. Information can be encoded in the magnetic characters, therefore you are required to use pre-printed stock for the check. |
There are three format types. Two of these are check format types and the other is a remittance format.
Remittance Forms
A remittance advice is a document sent to vendors that reports the invoices have been paid via direct deposit. When using direct deposit (ACH file) processing, remittance formats are printed during Print checks and post.
The appendix Implement Positive Pay and Direct Deposit documents the prerequisites and steps needed to set up direct deposit ACH file processing. You may want to refer to the appendix before designing your remittance forms.
You may use the Check and remittance forms selection to design a remittance form. A remittance form can be free-form and print any of the available fields that you want, as long as it is within the limits of what this feature provides. You may print them on plain paper or a pre-printed form of your own design. You may also copy a check format, make it a remittance type and tweak the design.
A/P comes with several predefined forms, as listed below. These predefined forms are provided following a new PBS installation. These forms are available in APFORMS.zip (or APFORMS.tar if Linux) for Company 00. Extract it and then restore it using aputil for company 00. For additional companies see note below:
|
Note |
Multi-Company Note The APFRMF00 is located in APFORMS.zip, found in the top-level PBS. You may restore this file and use these forms as a starting point. If you are using multiple companies and are using a company-ID other than 00, copy the APFRMF00.EXP file, replacing 00 with your company-ID for each company. Then do a restore of the file for each company using the data utilities. See the PBS administration documentation for information on using these utilities. Positive pay forms are in the same file as check and remittance forms. When you restore a positive pay form and you are using a check or remittance format, use the restore append restore option so you do not delete your current format. |
We suggest that you first become familiar with the predefined formats provided with this module. The following is a list of forms that are available in company 00 following a PBS installation.
|
Form No |
Type |
Name |
|
CHK4L |
Top/Bottom stub |
Format 4 Laser |
|
CHK4I |
Top/Bottom stub |
Form 4 with Image form file * |
|
CHK4D |
Top only stub |
Format 4 dot matrix |
|
TOP |
Top only stub |
Large stub |
|
REM |
Remittance |
Remittance form |
* This format requires a file named CHECK.BMP and should only be used in a Windows or Thin client environment. The CHECK.BMP file must to be located in the Images folder under the top-level PBS.
For a detailed list of the predefined forms use the Reports (Check and Remittance Forms) selection.
Described below are definitions for certain terms used in this selection and in this chapter.
Each Check form consists of three information groups: Header stub, Detail stub, and Stub total and Check.
The stub fields can print twice on a laser check, before and after the check. However, you only have to set up the stub fields once because the same fields will repeat on the bottom stub. They print once on a dot matrix check.
is the top part of the stub and typically includes information that relates to the check in general (for example, the vendor number, check date and check number). Header information always prints before the stub line information.
are beneath the Header stub fields and includes information on each voucher (such as the voucher number, reference, discount taken, and amount paid). Stub lines always prints after Header stub information.
You can enter one or multiple stub lines, each line with a different set of fields. The printing program will print as many sets of lines as possible on one stub. However, if there are more lines to print than will fit on the stub, it will print the remaining lines on as many additional stubs as needed. When multiple stubs are needed, all checks but the last one will be printed as a void check on the amount field.
fields will print on the bottom of the stub and on the check. This means the middle of a laser form or the second half of a dot matrix form.
There are two total amount fields. One is intended for the stub and the other for the check.
Stub total fields
This group includes a special stub total line. It is always the first line for this group, and when used it is normally the first line after the stub details. Never put any other field on the stub total line, unless you include the Total amount on stub field. The stub total line is not restricted to just the Total amount on stub field. You may also use any of the other fields from this group as long as the Total amount on stub field is also used.
Check fields
The entry of check fields must be after the stub total line and usually starts about 9 to 10 lines down the group. Minimally, the check should include the Total amount on check, Vendor name, Check date and Pay amount lines 1/2/3 fields. Additionally, you can include your company name/address and any of the other fields that are appropriate.
The form length is defined by the number of lines from the top of the form to the bottom. Our standard is to print 6 lines per inch. With a Company information printer an 11 inch long form produces 66 lines. But when using Windows printer, we recommend you start with 63 or fewer lines because the Windows print drivers normally allow larger margin (unprintable) areas than a Company information printer. A larger margin means fewer lines can print on a page. If you are using a dot matrix one stub form, the standard length is 42 lines.
When defining a check form, you specify the starting line number of the Header stub information, the starting and ending line numbers of the Stub lines information, the starting line number of the Stub total and Check information and the first line of the second stub for a laser check.
When defining each data field to be printed on the form, you specify the group of the field (Header stub, Stub lines, or Stub total and Check), its line number within the group, and the starting column number where it is to print.
The number of possible columns is determine by whether or not you use compressed printing. This is determined by the setting on the Compressed print field as explained later in this chapter. If it is compressed you may enter up to 132 columns. If it is not compressed then enter a maximum of 80 columns.
is its print line number starting at the first line of that group. For example, if you specified that the Line Item information starts on line 10 of your form and ends on line 40, you are allowing for 31 lines of Line Item information. The line number of a Line Item field must be between 1 and 31.
is simply the number of spaces to the right of the left margin of the form, beginning at 1.
|
Note |
When a pay-to address has been assigned to a vendor, the pay-to address fields will print on the form and not the vendor address fields. |
An unlimited number of check and remittance forms can be defined with this selection. Most information fields from vendors and open items may be selected to print on the format.
Select
Check and Remittance Forms from the Master Information menu.
Character Mode
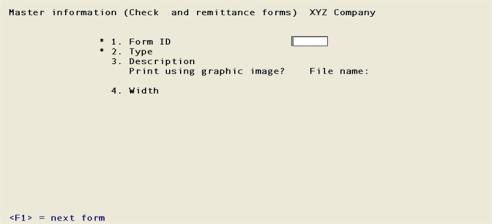
The following screen displays:
On this screen you identify the form with an ID, description and type. You may also define its general size.
From this screen you can work with both new and existing forms. If a form exists for the form ID and type you specify, that form appears and is available for changes or deletion.
Enter the following information:
1. Form ID
Options
Enter the ID for this form, or use the options:
|
<F1> |
For next form |
|
<SF1> |
For previous form |
|
Format |
Up to five characters |
|
Example |
Type: 40 |
2. Type
Enter the character that designates the type of format to be used. The types are listed here:
|
1 |
Checks top/bottom stub. This means the stub is above and below the check and is normally used on a laser printer. |
|
2 |
Checks top stub only. This indicates that only one stub will print above the check. These form types are usually used for dot matrix form feed printing. |
|
R |
Remittance form. This will only be used if you are using ACH processing in Accounts Payable. Some of the field names will be different than a 1 or 2 type. |
Options
You may also use the options:
|
<F1> |
To display the next type on file for this form ID |
|
<SF1> |
To display previous form IDs |
If the type you specify already exists for the form ID, the information for that form type displays and may be changed or deleted as usual. You also may use one of these options:
|
<F2> |
To display the form as it currently exists (see the section titled Displaying a Check and Remittance Form later in this chapter) |
|
<F3> |
To delete the form |
|
<F5> |
To print a test form, substituting X’s or 9’s for each field that you have selected to print (see the section titled Testing a Form later in this chapter) If there is a form file associated with the format, it will merge the form with the X’s and 9’s as well. |
|
<F6> |
To copy an existing form to a new form (see the section titled Copying a Form later in this chapter) |
|
Format |
One number from the Types above |
|
Example |
Type: 1 |
3. Description
Enter the description of this form type.
|
Format |
Up to 30 characters |
|
Example |
Type: Sample check form |
Print using graphic image?
This field is only available in Windows and Thin Client.
Answer Y to use a graphic image form file to merge with the data or N to print without an image file.
|
Format |
One letter, either Y or N |
|
Example |
Type N |
If you answer Y, you will be prompted to enter the name of the file.
If you are using a graphical image form file, you must select Windows printer when you print forms. The printers defined in Company information will not merge the form image file with the data.
File name:
This field is only available in Windows and Thin client.
You must make an entry in this field if you select Y to Print using graphic image?
Enter the name of the file that will merge with the forms data. This file must be either a J PEG or Bitmap file format. The file must be present in the top-level PBS directory called IMAGES and must be spelled exactly as the file name with the proper extension.
|
Format |
12 characters including the extension that must be either .jpg or .bmp. |
|
Example |
For this example, the entry of this field is not possible because you selected N to print a graphic image. |
Enter the number of columns that may be printed on a form. Your entry here is determined by the width of your form, as well as the setting on your printer for characters per inch (or pitch).
|
Format |
Up to three digits |
|
Example |
Type: 78 |
If you are using compressed printing, you can enter up to 132. If you are not using compressed printing, do not enter a number greater than 80. Field 11. Compressed print determines if your form is compressed or non-compressed.
5. Length
This is the length of the check or remittance form.
If printing a full 8.5x11 page on a laser printer using a Company information printer, enter 66 lines. Besides the length of the form, the number of lines you enter here is determined by the setting on your printer for the number of lines per inch.
If printing to a laser using Windows printer, we recommend in most cases that it not be more than 63 lines, but this number can vary depending on the amount of top and bottom margin space determined by the Windows printer driver. When designing a custom check to be provided by your forms supplier, design the check in PBS first and make sure it prints consistently on all the printers that are going to print the check before sending an example to your forms supplier.
If printing to standard dot matrix form with only one stub plus the check, enter 42 for the length.
|
Format |
Up to three digits |
|
Example |
Type: 63 |
6. First stub header line
or
First header line
Enter the first line number on which header information is to print.
|
Format |
Up to three digits |
|
Example |
Type: 1 |
7. First stub detail line
or
First detail line
Enter the first line number on which the check stub detail or remittance detail lines are to print.
|
Format |
Up to three digits |
|
Example |
Type: 4 |
8. Last stub detail line
or
Last detail line
Enter the line number on which the last line item is to print. Your entry must be higher than the line number specified for field 7.
|
Format |
Up to three digits |
|
Example |
Type: 16 |
9. Stub total & begin check
or
First total line
When designing a check, this field determines where the stub total is to print and it also determines where the check fields are to print. The stub total is the first line and the check can be any line after that.
When designing a remittance form, this field determines where the totals area starts on the form.
Enter the line number on which the last line item is to print. Your entry must be higher than the line number specified for field 8.
|
Format |
Up to three digits |
|
Example |
Type: 19 |
10. Bottom stub start line
This field will display as (Not applicable) if you are using the “Top only” or “Remittance” form types.
Enter the first line number on which the bottom stub information is to print. Your entry must be higher than the line number specified for Stub total line & check (field # 9), and less than the number of lines specified for Length (field # 5).
|
Format |
Up to three digits |
|
Example |
Type: 45 |
The form printing can either be 10 or 17 columns per inch. When printing at 17 columns per inch the print is considered compressed (narrower font).
You have several options of which part of the form that you want to compress.
|
C |
Check This compresses the check only. |
|
S |
Stub This compresses the stub only. |
|
B |
Both This compresses both the check and the stub. |
|
N |
None None of the form is compressed. |
This field relates directly to field 4. Width. A non compressed form is normally 80 columns or less. When designing a form that uses compressed print you can enter up to 132 columns for the width of the form.
|
Format |
One character, either C, S, B or N |
|
Example |
Type: N |
Field number to change ?
Make changes as usual. For an existing form you are then asked View/change form layout ?. Answer Y if you wish to review or work with any of the fields to be printed on the form.
When defining a new format, or if you specified to view the layout of an existing form, the following screen appears:
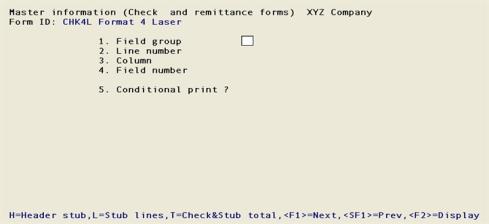
Many fields from different files may be selected to print on each form. On this screen you assign and describe each field to be printed on the form. For a list and description of each assignable field read the Check and ACH Remittance Form Fields appendix.
For each form design field, enter the information as follows:
1. Field group
Enter the form group.
|
H |
For a check type: Header Stub For a remittance type: Header |
|
L |
For a check type: Stub Lines For a remittance type: Lines |
|
T |
For a check type: Stub Total and Check For a remittance type: Total |
Options
You may also use one of the options:
|
<F1> |
For next field |
|
<SF1> |
For previous field |
|
<F2> |
To display the form as it appears so far (see the section titled Displaying a Check and Remittance Form later in this chapter) |
|
Format |
One letter from above. |
|
Example |
Type: H |
2. Line number
Enter the line number on which this field is to print, or press <F1> to the display the next field on file within this group.
|
Format |
Up to three digits. |
|
Example |
Type: 1 |
Enter the line number within the group on which this field is to print.
Using a check example, if you specified that the first line for stub header is 2 and the first line for stub line is 4, there are 2 lines available for the stub header group. This means that line numbers 1 through 2 would be valid entries here.
3. Column
Options
Enter the starting column in which to print this field, or use the option:
|
<F1> |
To display the next field past line one |
|
<F2> |
To insert a new line |
|
<F3> |
To delete the current line |
|
Format |
Up to three digits |
|
Example |
Type: 1 |
Your entry may not be greater than the width of the form.
At 4. Field number, the screen displays as follows:
If you specify a check stub line /remittance line or check stub total and check/remittance total group, different windows display, showing additional fields. To see the other window press <PgDn>. To return to a previous window press <PgUp>.
If you had previously selected any of these fields to print on this form, an asterisk appears next to the field number.
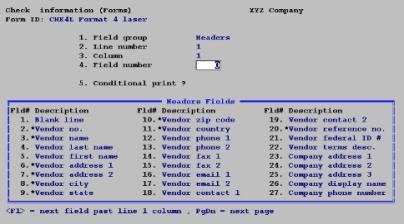
Refer to the Check and Direct Deposit Remittance Form Fields appendix, for a description of each field from each group.
Continue entering the information as follows:
Options
Enter the number of the field that you wish to select, or use one of the options:
|
<F1> |
To display the next field on file that is on or after this line number and column number |
|
<Enter> |
To enter a Literal (text) instead of a field number. Refer to Literal Fields section of this chapter. |
|
Format |
Up to three digits |
|
Example |
Type: 27 |
5. Conditional print ?
Answer Y if this field is to print only when some field (to be specified next) meets a specific condition. Answer N if this field should always print.
|
Format |
One character |
|
Example |
Type: N |
If you answer Y, these additional fields appear:
When Field-# 999
When the field selection window appears enter the number of the field upon which printing is dependent. Use the <PgUp> and <PgDn> keys to view additional windows.
Enter the conditions that this field must meet in order for the field being defined to print.
|
Format |
Two characters |
First, enter one of the following abbreviations:
|
EQ |
equal to |
|
NE |
not equal to |
|
GT |
greater than |
|
LT |
less than |
|
GE |
greater than or equal to |
|
LE |
less than or equal to |
Then enter the value that the dependent field must contain to complete the condition. Press <Enter> to indicate a value of zero (for a numeric or date field) or spaces (for an alphanumeric field).
|
Format |
One letter, either Y or N. |
|
Example |
Type: Y and then press <Enter>. |
If you need to print a field when either one condition or another is met, define the field specifying the first condition as described above. Then redefine the field, using the same line number, column number, and field number.
After entering the field number a message informs you that the field is already defined and you are asked if you wish to define a duplicate. Answer Y and complete the definition, specifying the other condition under which the field is to print.
This allows printing under one condition or the other. There is no way to request printing when both conditions are true.
The remaining fields control the appearance of data on the form. The fields requested depend on the type of field you selected in 4. Field number (field number 4). There are four different types:
may contain any combination of letters, digits, and special symbols.
only contain digits, along with any decimal points, minus signs or parentheses (for negative numbers), and commas.
only contain dates. Check date fields may be formatted.
contain text that you type. Literal fields are defined by pressing <Enter> at Field number, rather than specifying a field number.
Alphanumeric Fields
The following two fields display for each alphanumeric field:
6. Length
Enter the number of characters you want to print in this field, up to the maximum number shown, or press <Enter> for the maximum length of the field.
|
Format |
Up to two digits |
7. Justify
Enter R to right-justify the characters, or press <Enter> for no justification, to print the characters as entered.
If you specify right-justify, the characters will be aligned with the right-hand margin of the space for this field.
Numeric Fields
The following five fields display for each numeric field:
6. Integer digits
Enter the number of integers (digits to the left of the decimal point) you want to print in this field, up to the maximum shown, or press <Enter> for the maximum shown.
|
Format |
Up to two digits |
7. Decimal digits
(If the field has no decimal places, (Not applicable) displays here.)
Enter the number of decimal places you want to print, up to the maximum shown, or press <Enter> for the maximum shown.
Options
You may also use the option:
|
9 |
“Float” This means that there is no fixed number of digits before and after the decimal point; that is, the decimal point can float. |
|
Format |
One digit |
8. Commas ?
If the field has less than 4 integer digits, (Not applicable) displays here.
Options
You may also use the option:
|
Y |
To use commas when printing this field |
|
N |
To not use commas when printing this field |
|
$ |
To use a “$” dollar symbol and commas with this field |
|
Format |
One letter, either Y, N or $ |
9. Leading zeros ?
If you specified to use commas, (Not applicable) displays here.
Answer Y to include any beginning zeros when printing this field.
|
Format |
One letter, either Y or N |
10. Negatives ?
(If the field cannot be negative, (Not applicable) displays here.)
Enter the letter that designates how negative numbers are printed, as follows:
|
R |
Minus sign to the right of the number |
|
L |
Minus sign to the left of the number, in a fixed position |
|
F |
Minus sign to the left of the number, in a floating position |
|
C |
CR to the right of the number |
|
P |
Enclose number in parentheses (99.99) |
|
Format |
One letter from the table above |
When you complete entry of a numeric field, the print format of the field as you have defined it is displayed on the screen.
Date Fields
The following field displays for each date or time field:
6. Format
For a date field, select the format to use when printing this field as follows:
|
1 |
MM/DD/YY (03/31/08) |
|
2 |
MMM DD YY (Mar 31 08) |
|
3 |
MMM DD (Mar 31) |
|
4 |
DD-MMM-YY (31-Mar-08) |
|
5 |
Month DD, YYYY (March 31, 2008) |
|
6 |
MMDDCCYY (Display depends on separator value used) |
|
7 |
DDMMCCYY (Display depends on separator value used) |
|
8 |
CCYYMMDD (Display depends on separator value used) |
|
Format |
One digit |
Field 6, 7 and 8 require a separator value.
Separator
The value for this field will display as N/A (Not applicable) if you selected date field formats of 1, 2, 3, 4 or 5. For check formats 6, 7 or 8, select the separator value to print between the day, month and year:
|
1 |
None |
|
2 |
Dash |
|
3 |
Period |
|
4 |
Space |
|
5 |
Slash |
|
Format |
One digit, either 1, 2, 3, 4 or 5. |
When you complete entry the print format of the date or time as you have defined it is displayed on the screen.
Literal Fields
The following three fields display for each literal field:
6. Length (max = 80)
Enter the number of characters to be used when printing this field, up to the maximum shown, or press <Enter> for the maximum shown.
A total of 1000 characters is available for printing all literal fields on a form, with a maximum of 80 characters for each. (A message displays when less than 150 characters are available.)
|
Format |
Up to digits |
7. Text
Enter the exact text to be printed, up to the length specified in field # 6.
|
Format |
Up to 30 characters |
While entering a form you can press <F2> to see what the form looks like so far. Follow the screen instructions.
If one field overlaps another field, either question marks or asterisks appear in the area of overlap.
Question marks display if none of the overlapping fields are conditionally printed, in which case you probably need to change the position of a field.
Asterisks display if at least one of the overlapping fields is conditionally printed. In this case, you may wish to review the definitions of the overlapping fields to ensure that they do not print under the same conditions.
Displaying a form will not merge the form file.
Displaying a form has a limitation. If you are using compressed print on either the stub or check, but not both, it does not show the correct vertical relationship between the check and the stub. However, it will show the correct relationship between other fields in the stub or other fields in the check.
A test form can be printed that substitutes X’s or 9’s for each field that you have selected to print. You can print the test on the actual form you intend to use, or on plain paper. When using Print checks and post you can also print a test alignment form.
To test your check form, at the first Forms screen, display the form you wish to test and press <F5>.
When the printers defined from Company information display (or Windows printer if in Windows), select the printer on which this form is to be printed.
If you are on Windows or Thin client and you have selected to merge data with a form file, the form file will print with the test check form.
You can rapidly produce a new check form by copying an existing check form that is similar to the new one. After copying the form, tailor the new form by changing the form and field information as necessary.
To copy a form, at the first Forms screen
Display the existing check form that you wish to copy and press <F6>.
A window displays for you to enter the following information:
Copy to form ID
Enter the ID of the new form. The form ID will be automatically created during the copy process if it does not already exist.
Copy to type
Enter the character that designates the type of check for which this new form will be used. The types are:
|
1 |
Checks top/bottom stub |
|
2 |
Check top stub only. |
|
R |
Remittance form |
Options
You may also use the Option
|
<F5> |
To copy All types of the existing form ID to the same types for the new form ID |
If the type you specify already exists for the new form ID, the form cannot be copied and an error message is displayed.
After the copy process is complete you may change the new form as needed.
This selection prints a report that lists the check and remittance forms you have defined. You may select to print a specific form type or all form types.
For each form type on the list you are shown general information. The field definitions for each form type may also be optionally printed.
Select
Check and Remittance Forms from the Report menu.
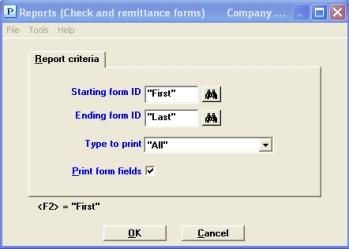
Graphical Mode
The following screen will appear:
Character Mode:
This is the screen you see:
On the screen that appears, enter the following:
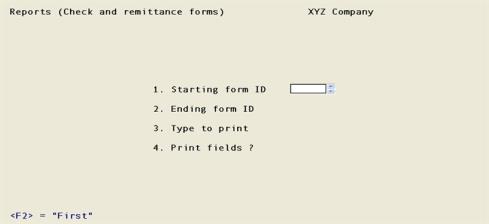
Ending form ID
Enter the range of form IDs for which to print the list. Follow the screen instructions.
Options
You may also use the following option:
|
<F2> |
For "First" for Starting form ID For "Last" for Ending form ID |
|
Format |
Up to five digits |
|
Example |
Press <F2> at both fields |
Select the form type to print for the forms. The selections and options are:
| Character Mode | Graphical Mode | Description |
|
1 |
Checks top/bottom stub |
Checks, top/bottom stub - for laser printer |
|
2 |
Checks top stub only |
Checks, top stub only - for dot matrix printer |
|
R |
Remittance |
Remittance form |
|
<F5> |
"All" or <F5> |
To print "All" form types |
|
Format |
One letter from the table above |
|
Example |
Press <F5> to select "All" |
Leave this box checked to print the information defined for each field on a form. If you uncheck it, only the general information about a form is printed.
|
Format |
Check box where checked is yes and unchecked is no. The default is checked |
|
Example |
Press <Enter> to accept the default |
Select OK to print or Cancel to return to the menu without printing.